(235,’2006-08-03 12:00:00′,’figNoggle’,’2007-01-29 08:26:06′,’david’,’8×12 CNC Project – Installing DRO Scales Part 2 – Shocking!’,”,’We noticed that the display was acting funny yesterday. After a few hours it just all of a sudden became dimly lit. It was on, but noticably dimmer to the point where the LCD display could be barely read.
After unplugging, replugging a few times, it seemed to have resolved itself and we were back to doing things with the 8×12.
Today, it appeared fine until we were going to put the DRO to use. Again, the problem arose. Thinking that maybe it was the cable, we swapped that out. No go. Then we tried both cables with the 6″ vertical scale thinking that it was the scale. At this point the culprit appeared to be the 18″ horizontal scale (the one shown in Part 1 of this journey).
After removing the scale and cleaning it up (at this time the unit was frozen at “0.000” and prior experience taught us that the scales when dirty can do strange things).
After the scale was cleaned with acetone, the battery was re-inserted and voila! The scale was no longer frozen.
At this point, the Shars display appeared to be the culprit. That is until the scale was being reinstalled and we noticed a small spark from the tip of the screw that mounts the bracket to the saddle. Aha! Now that’s something to look at…
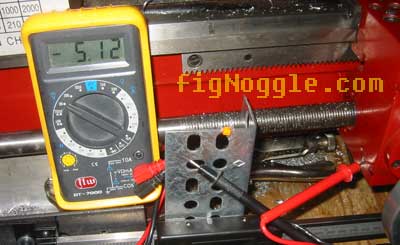
So, after putting a voltmeter between the bracket and saddle, it read roughly 5VDC.
Now what?
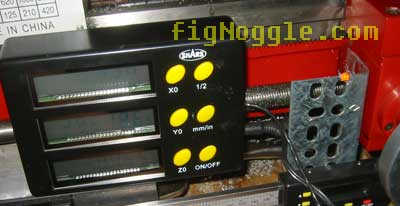
Before we get there, here’s what we’ve been talking about all along. Here is the before and after of the display with the circuit completed and with the circuit interrupted:
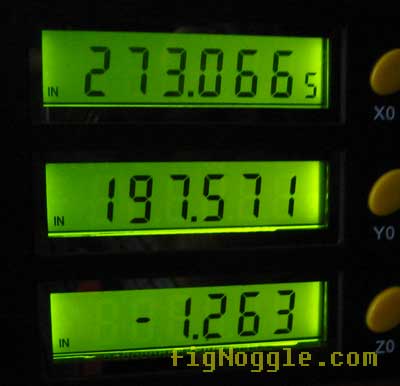
Display with scale bracket disconnected from saddle or lathe unplugged or cable disconnected (basically the DRO display outputs can’t be simultaneously connected to power while the lathe is connected), the display is bright:
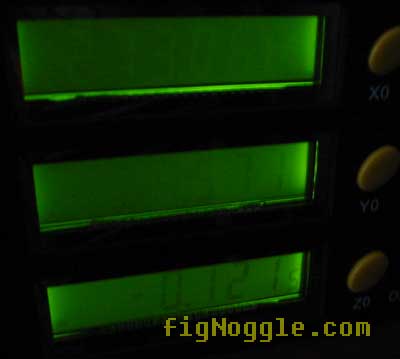
Now, with everything connected, the display dims:
Same as before, just with the entire assembly shown (this is a temporary mock-up, so please don’t mind the mess!):
And circuit completed:
So now that we’ve figured out there’s a small amount of juice here, what’s next?’
If you missed part 1 of this installation, here it is.
Here’s what the X-axis DRO scale mounted looks like.
‘,’
We noticed that the display was acting funny yesterday. After a few hours it just all of a sudden became dimly lit. It was on, but noticably dimmer to the point where the LCD display could be barely read.
After unplugging, replugging a few times, it seemed to have resolved itself and we were back to doing things with the 8×12.
Today, it appeared fine until we were going to put the DRO to use. Again, the problem arose. Thinking that maybe it was the cable, we swapped that out. No go. Then we tried both cables with the 6” vertical scale thinking that it was the scale. At this point the culprit appeared to be the 18” horizontal scale (the one shown in Part 1 of this journey).
After removing the scale and cleaning it up (at this time the unit was frozen at “0.000” and prior experience taught us that the scales when dirty can do strange things).
After the scale was cleaned with acetone, the battery was re-inserted and voila! The scale was no longer frozen.
At this point, the Shars display appeared to be the culprit. That is until the scale was being reinstalled and we noticed a small spark from the tip of the screw that mounts the bracket to the saddle. Aha! Now that’s something to look at…
So, after putting a voltmeter between the bracket and saddle, it read roughly 5VDC.
Now what?
Before we get there, here’s what we’ve been talking about all along. Here is the before and after of the display with the circuit completed and with the circuit interrupted:
Display with scale bracket disconnected from saddle or lathe unplugged or cable disconnected (basically the DRO display outputs can’t be simultaneously connected to power while the lathe is connected), the display is bright:
Now, with everything connected, the display dims:
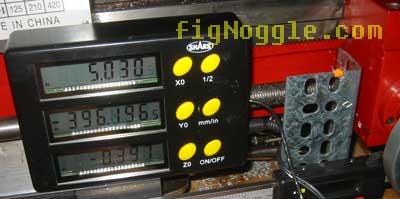
Same as before, just with the entire assembly shown (this is a temporary mock-up, so please don’t mind the mess!):
And circuit completed:
So now that we’ve figured out there’s a small amount of juice here, what’s next?’
If you missed part 1 of this installation, here it is.
Here’s what the X-axis DRO scale mounted looks like.
‘,’We noticed that the display was acting funny yesterday. After a few hours it just all of a sudden became dimly lit. It was on, but noticably dimmer to the point where the LCD display could be barely read.
After unplugging, replugging a few times, it seemed to have resolved itself and we were back to doing things with the 8×12.
‘,’
We noticed that the display was acting funny yesterday. After a few hours it just all of a sudden became dimly lit. It was on, but noticably dimmer to the point where the LCD display could be barely read.
After unplugging, replugging a few times, it seemed to have resolved itself and we were back to doing things with the 8×12.
‘,”,’8x128x14-Small-Lathe’,”,0,”,0,4,1,1,’article’,”,”,’8×12-cnc-project-installing-dro-scales-part-2-shocking’,”,”,”,”,”,”,”,”,”,”,’73bac35bacfbf19b44f78c32b82018a5′,’2006-08-03′);