(260,’2006-12-18 21:45:27′,’david’,’2006-12-21 14:20:33′,’david’,’8″x12″/14″ Small Lathe Leadscrew and Nut Replacement with 5/8″x8 TPI ACME’,”,’Ever wanted to replace the stock leadscrew and nut from your mini-lathe or small lathe?
We were wondering this ourselves. The stock leadscrew and nut is not of great quality and in fact quite “rough”.
Since we have lots of Nook brand ACME leadscrews of 5/8″ diameter and 8 TPI (both right and left hand threads), we thought we’d give it a try.
It helps if you have another lathe at your disposal. We used the 7x mini-lathe to turn the leadscrew and other pieces.
Since the 5/8″ diameter screw is of larger diameter than the stock, we ran into an intereference problem. The stock leadscrew is turned from a single piece and slips through the bearing block spacer. Unfortunately, the 5/8″ diameter is too large for the spacer. Now, we could have just enlarged the through hole of the block, but that’s a piece not easily replaced.
So, we had to make our version in two pieces: the part that goes throught the block and the actual leadscrew:
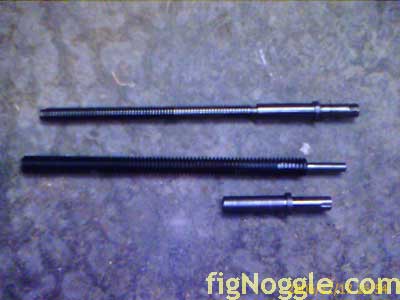
Our thinking was that we could just make a nice intereference fit and heat the bearing shaft end and insert the leadscrew:
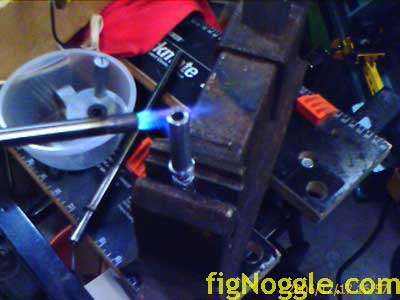
It didn’t quite work as planned.. We had more than .005″ of interference and the expansion of the steel shaft didn’t expand as planned:
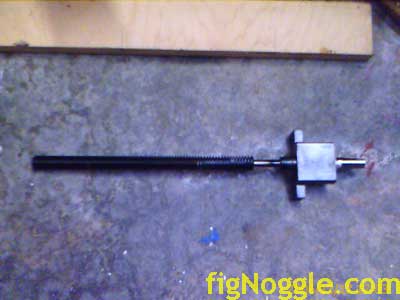
The 1 1/2″ shaft of the leadscrew was supposed to fit in nice and tight, but it didn’t. So, we had to cut that down and use plan B: some interference fit and a pin to keep them together. After working it some more, we had the entire unit assembled with the spacer block:

To make the nut, we made it of 1″ diameter brass stock. This was the easiest way to make it since the cross slide had this recess to accept the nut:

All that was needed was to turn down the bit for the recess and then the thread was tapped in the mini-mill.
Here’s the nut on the slide:
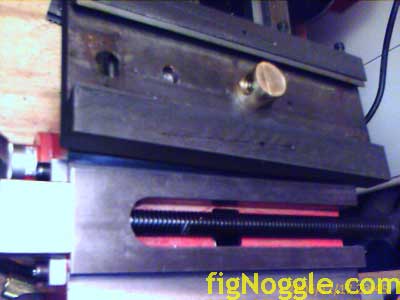
And the final assembly of the screw/nut:

Since this nut wasn’t of the split variety, there is still backlash. However, it’s actually less than the stock setup! Unfortunately, the dials no longer make any sense since the stock reading is .002″ per click whereas now, it’s something a bit over .001″ per click.
We’ll need to address this either by changing the leadscrew TPI so it’s an eas multiplier of the stock dial or change th dial itself (not so easy).
Hope this helps!’,’
Ever wanted to replace the stock leadscrew and nut from your mini-lathe or small lathe?
We were wondering this ourselves. The stock leadscrew and nut is not of great quality and in fact quite “rough”.
Since we have lots of Nook brand ACME leadscrews of 5/8” diameter and 8 TPI (both right and left hand threads), we thought we’d give it a try.
It helps if you have another lathe at your disposal. We used the 7x mini-lathe to turn the leadscrew and other pieces.
Since the 5/8” diameter screw is of larger diameter than the stock, we ran into an intereference problem. The stock leadscrew is turned from a single piece and slips through the bearing block spacer. Unfortunately, the 5/8” diameter is too large for the spacer. Now, we could have just enlarged the through hole of the block, but that’s a piece not easily replaced.
So, we had to make our version in two pieces: the part that goes throught the block and the actual leadscrew:
Our thinking was that we could just make a nice intereference fit and heat the bearing shaft end and insert the leadscrew:
It didn’t quite work as planned.. We had more than .005” of interference and the expansion of the steel shaft didn’t expand as planned:
The 1 1/2” shaft of the leadscrew was supposed to fit in nice and tight, but it didn’t. So, we had to cut that down and use plan B: some interference fit and a pin to keep them together. After working it some more, we had the entire unit assembled with the spacer block:
To make the nut, we made it of 1” diameter brass stock. This was the easiest way to make it since the cross slide had this recess to accept the nut:
All that was needed was to turn down the bit for the recess and then the thread was tapped in the mini-mill.
Here’s the nut on the slide:
And the final assembly of the screw/nut:
Since this nut wasn’t of the split variety, there is still backlash. However, it’s actually less than the stock setup! Unfortunately, the dials no longer make any sense since the stock reading is .002” per click whereas now, it’s something a bit over .001” per click.
We’ll need to address this either by changing the leadscrew TPI so it’s an eas multiplier of the stock dial or change th dial itself (not so easy).
Hope this helps!
‘,’Ever wanted to replace the stock leadscrew and nut from your mini-lathe or small lathe?
We were wondering this ourselves. The stock leadscrew and nut is not of great quality and in fact quite “rough”.
Since we have lots of Nook brand ACME leadscrews of 5/8″ diameter and 8 TPI (both right and left hand threads), we thought we’d give it a try.
It helps if you have another lathe at your disposal. We used the 7x mini-lathe to turn the leadscrew and other pieces.
Since the 5/8″ diameter screw is of larger diameter than the stock, we ran into an intereference problem. The stock leadscrew is turned from a single piece and slips through the bearing block spacer. Unfortunately, the 5/8″ diameter is too large for the spacer. Now, we could have just enlarged the through hole of the block, but that’s a piece not easily replaced.
So, we had to make our version in two pieces: the part that goes throught the block and the actual leadscrew:
‘,’
Ever wanted to replace the stock leadscrew and nut from your mini-lathe or small lathe?
We were wondering this ourselves. The stock leadscrew and nut is not of great quality and in fact quite “rough”.
Since we have lots of Nook brand ACME leadscrews of 5/8” diameter and 8 TPI (both right and left hand threads), we thought we’d give it a try.
It helps if you have another lathe at your disposal. We used the 7x mini-lathe to turn the leadscrew and other pieces.
Since the 5/8” diameter screw is of larger diameter than the stock, we ran into an intereference problem. The stock leadscrew is turned from a single piece and slips through the bearing block spacer. Unfortunately, the 5/8” diameter is too large for the spacer. Now, we could have just enlarged the through hole of the block, but that’s a piece not easily replaced.
So, we had to make our version in two pieces: the part that goes throught the block and the actual leadscrew:
‘,”,’8x128x14-Small-Lathe’,”,1,’Comment’,0,4,1,1,’article’,”,”,’8×1214-small-lathe-leadscrew-and-nut-replacement-with-58×8-tpi-acme’,”,”,”,”,”,”,”,”,”,”,’8fa229dad6f98c3fdecd2b500dd11d78′,’2006-12-18′);